


- SPU: AL-6FBF-84nmjrgl[4]
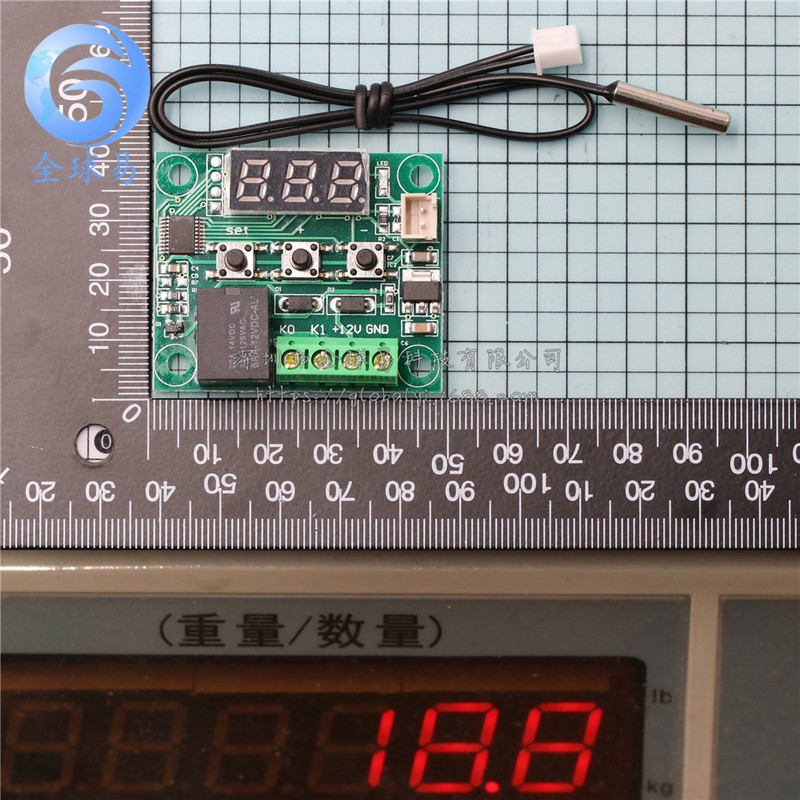
- Model: XH-W1209
- Processing customization: No
- Type: Other ICs
- Resolution: Details visible
- Weight: Details visible
- Scope of application: Details can be seen
- Material: Details visible
- Temperature measurement range: details can be seen
- Humidity measurement range: details can be seen
- Temperature measurement accuracy: details can be seen
- Temperature resolution: details are visible
- Humidity measurement accuracy: details can be seen
- Humidity resolution: details visible
- Temperature measurement error: details can be seen
- Humidity measurement error: details can be seen
- Using batteries: details can be seen
- Specification: Acrylic shell (excluding W1209 module)
- Specification: 12V red light
reminder:The product has 5V power supply and 12V power supply. The digital display color is blue light or red light. Please choose when purchasing!
For those who purchase acrylic shells, each board comes with double-sided protective film, which must be removed before installation
(Provide detailed descriptions in both Chinese and English)
Chinese description:
1、 Product features
1. Complete machine SMT, wave soldering, stable performance, and good consistency
2. Embedded CPU chip(MCU)More intelligent, lower power consumption
3. Automatic memory for power-off settings(Built in EEPROM storage unit)
4. Control accuracy of 0.1 degrees Celsius
5. Set the deviation from 0.1 and control decimals(0.1-15.0)
2、 Technical parameters
Temperature control range:-50~110℃
resolving power:-9.9~99.9 hours 0.1 ℃ Other temperature ranges 1 ℃
Temperature measurement accuracy:0.1 ℃
control accuracy:0.1 ℃
Backtracking accuracy:0.1 ℃
refresh frequency:0.5 S
Input power supply:DC 12V
Measurement input:NTC(10K 0.5%)Waterproof sensor
output:1 relay output, capacity=20A 125VAC,20A 14VDC
Environmental requirements:-10~60 ℃ humidity 20%-85%
Specifications and dimensions:48.5*40mm
Power consumption of the entire machine:Static current:≤10MA suction current:≤65MA
3、 Usage
Once the power supply and equipment are connected, power can be supplied to the controller. At this time, the temperature measurement will be displayed. Press the SET button once, and the display screen will flash. Press+- to set the desired temperature(Press and hold+- for quick lifting and lowering)After completing the setting, press SET to confirm and return. At this time, the controller will automatically execute the relay on/off according to the setting!The output of the temperature controller is to meet various high-power loads. Once the control circuit is connected, power can be supplied to the temperature controller. At this time, the display screen shows the ambient temperature,
4、 Explanation of indicator lights, digital tubes, and buzzer status
indicator light:Flashing indicates a delay in starting cooling or heating, while a constant light indicates that the relay is closed
Digital tube:Display LL as sensor open circuit, please follow the instructions to connect the sensor properly;Display HH as exceeding the measurement range. The temperature controller will forcibly disconnect the relay;display---For high temperature alarm
5、 Parameter Function Description
Long press SET, press+- to switch P0... P6, long press SET or for 10 seconds without any button action. The controller automatically confirms and returns
P0 cooling and heating mode:
Long press SET for 5 seconds to display P0, press SET once to set the working mode, press+- to switch[][C is the cooling mode]Press SET once to return, long press SET or for 10 seconds without any button action. The controller automatically confirms completion
In cooling mode:When the temperature measurement value≥At the temperature setting point, the refrigeration relay is engaged and the refrigeration unit starts;When the temperature measurement value≤Temperature setting point-When returning to the differential, the refrigeration relay is disconnected and the refrigeration unit is turned off
In heating mode:When the temperature measurement value≤At the temperature setting point, the heating relay is engaged and the heater starts;When the temperature measurement value≥When the temperature setting point+return difference is reached, the heating relay is disconnected and the heater is turned off
P1 return difference setting:
Long press SET, press+- to switch to P1, press SET once to set the return value, press+- to set, and after completion, press SET once to return. Long press SET or press for 10 seconds without any button action. The controller automatically confirms completion
In cooling mode:When the temperature measurement value≥Set value, relay engaged, refrigerator started;When the temperature measurement value≤Set value-When returning to the differential value, the relay opens and the refrigeration unit closes
For example, in an environment where the temperature difference is set to 2 ℃, the relay closes and the refrigeration unit starts after being powered on. When the cooling reaches 23 ℃, the relay opens and the refrigeration unit closes. At this time, since the refrigeration unit has already been disconnected, the temperature begins to rise. When the temperature rises to the set value of 25 ℃, the relay closes and the refrigeration unit starts again. In this way, the temperature is repeatedly controlled not to exceed 25 ℃
In heating mode:When the temperature measurement value≤Set value, relay engaged, heater started;When the temperature measurement value≥When the set value+return difference is reached, the relay is disconnected and the heater is turned off
For example, if the environment is set to 10 ℃ and the temperature difference is set to 25 ℃, and the temperature difference is set to 2 ℃, when the heating reaches 27 ℃, the relay will disconnect and the heater will be turned off. At this time, since the heater has already been disconnected, the temperature will begin to decrease. When the temperature drops to the set value of 25 ℃, the relay will close and the heater will start again. In this way, the temperature will be controlled to not be lower than 25 ℃ through reverse circulation
P2 high temperature setting upper limit:
To avoid the danger of setting the temperature too high due to misoperation by others, this temperature controller has a high setting upper limit function, which limits the setting range of the high temperature setting point controlled by the temperature controller
Press+- to switch to P2, press SET once to set the upper limit, press+- to set the temperature that can be set high, with a maximum value of 110. After completion, press SET once to return, long press SET or press for 10 seconds without any button action. The controller automatically confirms completion
for example:If the temperature set point is set to 60 ℃, it can only be set to 60 ℃. If you want the temperature set point to be higher and the temperature range to be expanded, you need to adjust the upper limit setting value first
P3 Low temperature setting lower limit:
To avoid the risk of freezing due to improper operation by others, this temperature controller has a low setting upper and lower limit function, which limits the setting range of the low temperature set point controlled by the temperature controller
Press and hold SET for 5 seconds to display P0, press+- to switch to P3, press SET once to set the lower limit, press+- to set the temperature that can be set to low, the low value is-50. After completion, press SET once to return. Long press SET or for 10 seconds without any button action. The controller automatically confirms completion
for example:If the temperature set point is set to 2 ° C, it can only be set to 2 ° C. If you want the temperature set point to be lower and the temperature range to be expanded, you need to adjust the lower limit setting value first
P4 temperature correction:
When there is a deviation between the measured temperature and the standard temperature, or due to special hardware needs of the user, this function can be used to calibrate the corrected temperature=The effective range of temperature before calibration and calibration value is-7.0~7.0.
Press and hold SET for 5 seconds to display P0, press+- to switch to P4, press SET once to calibrate, press+- to set the calibration value, press SET once to return, press and hold SET for 10 seconds without any button action. The controller automatically confirms completion
For example, the normal display is 25 degrees;Display 25 degrees when the temperature is corrected to 0;Display 26.5 degrees when temperature corrected to 1.5;Temperature correction to-At 1.5, display 23.5
P5 delayed start time(Company:minute):
When there is a need for a delay in the operation of the refrigerator or heater, the delay function can be activated to protect the equipment's lifespan
Long press, press+- to switch to P5, press SET once to set the delay start time in minutes, press+- to set 0-10 points, press SET once to return after completion, and the controller will automatically confirm completion without any button action
In cooling mode:Secondary power on, if the current temperature≥At the set value, the refrigeration unit will not immediately start cooling and needs to run for the set delay time before starting
In heating mode:Secondary power on, if the current temperature≤When setting the value, the heater will not immediately start heating and needs to run for the set delay time before starting
When the shutdown time between two adjacent starts of the refrigerator or heater exceeds the set value of the delayed start time, the refrigerator will start immediately
When the shutdown time interval between two adjacent starts of a refrigerator or heater is less than the set delay start time, the equipment can only be started after running the set delay start time of the refrigerator again. The delay time is calculated from the moment of shutdown
For example, in the cooling state, a delay of 5 minutes is set. After starting up, the refrigeration unit starts with a delay. When the required temperature is reached, the refrigeration unit stops and starts counting. The next refrigeration unit starts counting and starts working immediately. If the counting is not completed, it must wait for the counting to end before working. During the delay, the LED indicator light flashes
When the delay start is set to 0, it is equivalent to disabling the delay function
English description:
Specifications:
Temperature range:-50-110 °
Dimensions:forty-eight point five*40mm
Temperature control mode:ON/OFF
Resolution:When temperature is, the resolution is-9.9~99.9, other temperature segment is 1°
Control accuracy:0.1 °
Hysteresis accuracy:0.1°
Refresh rate:0.5S
High temperature protection: 0-110°
Supply voltage:DC 12V
Static current:≤35MA, attract current ≤65MA
Output voltage:DC 12V
Output power:20A relay
Measurement input:NTC(10K 0.5%)Waterproof Sensor
Connect the power supply and the load, you can supply to the controller,
Is displayed as a measured temperature,
Press thebutton, the display flashes the temperature,
Press-to set the desired temperature,
After setting press SET to confirm return,
The controller automatically performs the relay by setting off!
Lights, LED status descriptions:
Indicator:Off The relay is switched off, Always indicate the relay is closed.
LED:Shows LL is the sensor open, showing?HH is out of range, the thermostat will be forced to close the relay, the display---as high temperature protection.
1 x-50-110°C Digital thermostat Temperature Control Switch 12V + sensor


X


+'&media=https%3A%2F%2Fcbu01.alicdn.com%2Fimg%2Fibank%2FO1CN0155nljy2N30BcqRNbU_%21%212210293519906-0-cib.jpg&description=XH-W1209+digital+display+thermostat+high-precision+temperature+controller+temperature+control+switch+micro+temperature+control+board'))